Showing posts with label sotfware. Show all posts

Wednesday, 11 January 2012

Panorama Photography

Assalamualaikum dan Selamat Sejahtera

Panorama??
Apa yang korang tahu pasal panorama photography.  Kalau korang baca maksud panorama dalam wiki, panorama adalah 180 degree wide angle view melalui photography, lukisan dan macam2 lagi..korang leh google cari kat internet. senang nak cari maksud nyer. 


Tuesday, 25 October 2011

How to edit photo using Adobe Lightroom

First of all, adobe lightroom must be install in computer. Open your lightroom, then click 'import' to import photo from folder..
Click 'import'
then select the folder you one.
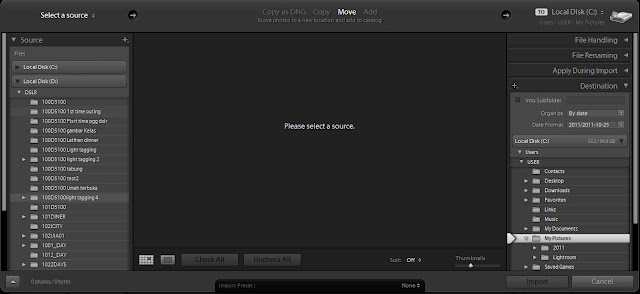
Select the folder you want to use
Select the picture that you want to edit
then click 'import' at the left side
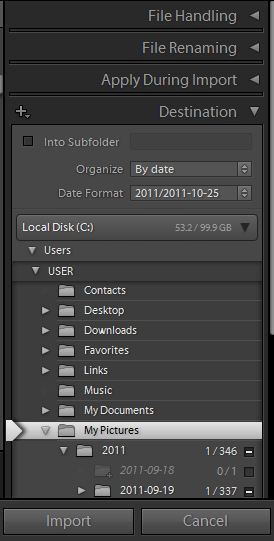
click 'import'
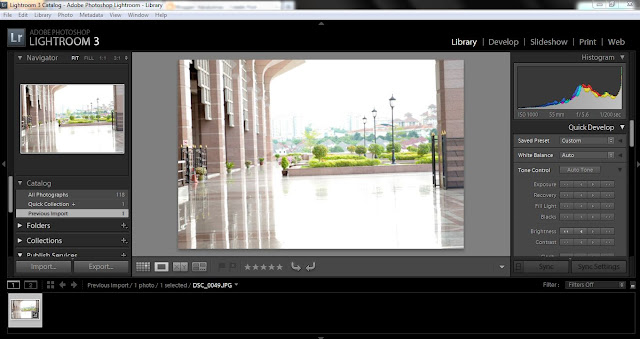
your picture will appear at screen, then double click to large the picture size..for example, I choose overexposure picture..
The photo with overexposure
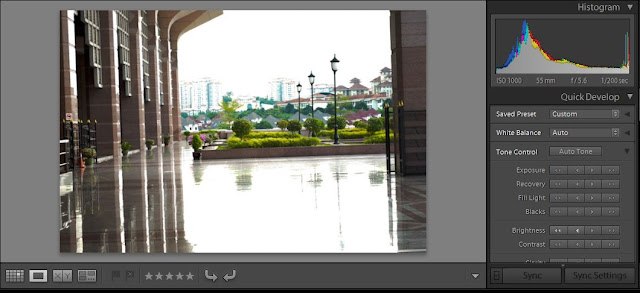
 Click 'Auto Tone'
Photo become normal exposure, but still bright
 Adjust the tone at the 'Tone Control' such as decrease exposure, decrease brightness, increase contrast, increase vibrance.
Tone and color level column
 So, your photo become like this
after first tone level
 If you feel photo still bright or not contrast, so decrease brightness and increase contrast
this is the result
 Then save your photo

click 'export' to save
This will appear..
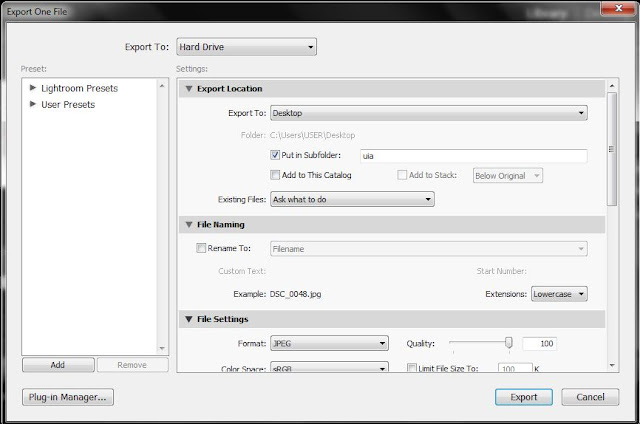
export to where you want, and put in subfolder
So, this the result of your photo
this is the result
So, what do you think? Easy right. So you can try it.

Saturday, 22 October 2011

Bagaimana hasilkan gambar yang Cantik dari segi warna.

Assalamualaikum...

Pagi-pagi buta ni, aku terjaga dari tidut dan terus mengadap laptop. maklumlah xbiasa tidur kat rumah kwan disamping nak bertolak g kuantan jam 4 pagi ni. So, bagaimana nak hasil kan gambar yang cantik dari segi warna. bak kate photographer senior yang aku kenal,"gambaq biaq contrast color nyer"(macam 2 kot bunyi ni). So, banyak kali aku tanya kawan-kawan aku, tapi aku still tak dapat tangkap (anyone, please help me!!!). Dari ape yang aku belajar, nak gambar nak cantik, kene la daripada kamera. Setting yang digunakan lebih pada VIVID. Vivid ni akan menimbul kan warna-warna yang kita tangkap. Gambar-gambar yang kita tangkap, slalu nyer edit pakai software, contoh nyer:

1. Photoshop
photoshop
2. Lightroom
Lightroom
Ni antara software yang aku ade dan tahu serba sedikit. Selalu nyer gambar-gambar yang aku edit juz letak watermark, contrast terbiar sebab still tak paham pasal level and color balance... Siapa-siapa leh tolong x, terangkan..sharing is caring, right...
cukup untuk pagi ni.. I'm coming Kuantan, Hope nice picture there..

Thursday, 20 October 2011

How to make header using photoshop(english version)

Header in Blog..how to make it?
First of all, choose NEW at File. So your screen will appear something like this:
this setting to fixed your background
So, choose Web at preset, and change the background content to Transparent, if you want your background transparent. Then click Ok.
your background will appear like this
When, you have your background, you can start to make your header. For example, i choose all image below to make header.


All pictures that i choose, i crop, erase any unwanted thing and drag it to my background. You can duplicate the image you want, f it suitable with your header.
this a header that has finish edit
the header must be simple and not to crowded with image, so it can seen nice. When the header finish, we need to save it using 'png' format..
use 'png' format
click 'interlaced' to confirm your background transparent.
click 'interlaced', then ok
the result will show like this

Nice to try..Nice to share..

Wednesday, 19 October 2011

Bagaimana nak buat header guna Photoshop(how to make header using Photoshop)..

Dalam keboringan petang, aku wat satu lagi header baru...mungkin minggu ni, minggu untuk photo editing.
jd mcm mn aku header ni..

ni header nyer..dah pun letak pada blog si Dia
first skali aku pilih NEW..akan kuar  benda ni..


Selepas itu, pilih Web. kalau nak lagi besar, tukar pada saiz..kalau nak background transparent just tukar pada background content. dah siap pilih, juz click ok. akan kuar macam ini.


apabila dah kuar benda ni,  pilih gambar yang korang nak. contoh gambar yang aku pilih..


Atas ni, adalah gambar-gambar pilihan aku..so aku crop, potong ikut kehendak aku. so, bila siap semua, akan jadi macam ni.


bila dah siap, just save guna format 'png', dan amik 'interlaced' untuk background transparent.
save in png format

take interlaced for transparent background
hasil nya,

selamat mencuba..u must try it..

Bagaimana nak buat header guna photoshop

Header baru aku...
memang nampak mcm biase..tapi background transperant

Sedang boring..aku wat header untuk blog aku..first header yang aku wat dulu..cukup gemuk... mula-mula buat header aku juz guna photoshop untuk crop gambar saja..biasa la..MALAS...

Header pertama aku...

Header aku yang kedua macam header baru aku, tapi buruk sikit, sebab background dia putih..sepatutnya background transperant, tapi ape silap nya aku pun baru tau..juz salah format masa save jer..
yang ni background warna putih..so, jadi rosak aku nyer header..

yang ni yang terbaru...macam yang kat atas 2..

yang ni lak, header untuk si Dia...Fatin adawiah..

Saja aku wat besar-besar, nampak sikit kan...hahaha
Lupa nak cerita...nak wat guna adobe...juz amik NEW..setting pada WEB...amik LEADERBOARD...klu rase kecik, tambah saiz sendiri...and amik transparent untuk background...so...gne la kreativiti sendiri..untuk wat header...kalau aku, aku guna gambar-gambar yang aku tangkap..mudah nak cari, xpayah susah-susah pikir...
Related Posts Plugin for WordPress, Blogger...